5.1 Virtual Terminal
Author: Dr. Alejandra Rougon

This work is licensed under a Creative Commons Attribution-NonCommercial 4.0 International License.
Log in to a virtual terminal in the CS50 sandbox
Learn the different sections of the online platform
Create a file and a folder on your online terminal

CS50 Sandbox https://sandbox.cs50.io/ is a platform were you will be able to create and share virtual terminals. This platform is very useful for learning to work with the command line. You can go directly to the CS50 sandbox and just click on create to get a new terminal or go to a specific terminal that has already been created for you to work in. If you create a new terminal the changes that you make will be there the next time you enter that terminal. If you enter to a terminal that has been created by another person, the changes that you make will be eliminated and won’t be there the next time you enter to that terminal.
So, first create a new terminal on the CS50 sandbox or go to an already created Virtual Terminal
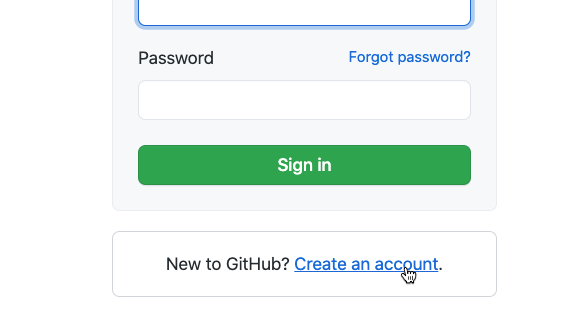
If you are not logged in to your github account the following screen will appear

If you already have a github account just sign in and then click on the Virtual Terminal link again. However, if you don’t have one just create one
You will only need an email address and a password. Once created you can sign in and click again on the Virtual Terminal link.
The following image shows how your terminal looks like. In the left hand side there is a folder icon that opens your directory side bar. You can click on it to open and close the side bar.

This platform has three sections. It contains a text editor, a terminal and a directory browser called Filetree. These three tools are very useful for learning how to use the command line interface. If you are working on your computer it will be important to have these three tools open as well. Just bear in mind that some text editors (eg. Microsoft Word, Text Edit, Libre Office Writer) won’t work since they introduce hidden characters. There are many good text editors available for Bioinformatics. Here is a list of some of the most common text editors.
Text Editor |
Linux |
Mac |
Windows |
Free |
Comments |
|---|---|---|---|---|---|
x |
x |
x |
x |
Highly configurable |
|
x |
x |
x |
x |
Basic functions |
|
x |
x |
Can run in other platforms through wine |
|||
x |
Known before as TextWrangler |
||||
x |
x |
x |
x |
Even though there is a license, currently there is no time limit for evaluation |
This image shows how the three sections are distributed in the virtual terminal

You can ceate New Directories or New Files form the three dots in the Filetree side bar.

With the + signs you can create files (in the top) and new terminals (in the bottom).

You can also move up and down the middle line to increase the size of the terminal or editor screen.

Now let’s create a new file using the file editor. It is important to follow some rules when naming your new file.
You should not use special characters such as
%,´,*,|,\, etc.Underscore
_and dot.are allowedYou should not use spaces. Instead of
My fileyou can useMy_fileorMyFile
The extension of a file won’t interfere in the processing. If you have a text file you will be able to work with it in the command line if the extension is .txt or any other or even if there is no extension (My_file.txt, My_file, My_file.hello). However, it is a good practice to name a text file with the extension .txt in case you want to open it with a third party text editor. Also you will be able to recognize what kind of file you have just by looking at the extension. In Bioinformatics you will work with text files but in different biological formats. So it is important to add the extension of the corresponding biological format (eg. .fasta, .gff3, .sam, etc.).
Create a new file called Readme.txt and add the following text. This is my first file from Plants & Python Command Line Lesson.
You don’t have to save it as everything you type in will be saved automatically. In the Filetree section you will see your file. If you position the mouse in the three dots area you will find the options for renaming, duplicating, downloading or deleting your file.
You can close your file by pressing the x symbol in the editor section.

Now create a new directory called Documents. Your Filetree will look like this.

Note: Directories are also called folders.
🔑 In this lesson you have learned to:
Create a github account
Log in to a virtual terminal on the CS50 sandbox
Learn the different sections of the online platform
Create a file and a folder on your online terminal